Directory Management Is Important: Here’s Why

There’s been talk lately about the diminishing importance of keeping firm control over each and every directory listing, large or small, in your firm’s name. This talk is rooted in truth, for tools such as Yext and Moz Local do a pretty good job of cleaning up directories in your name across the web. In addition to this, search engines have a good idea of what directories/websites matter, and pay more attention to those. It’s VERY important to note, however, that some manual directory cleanup can go a long way. At a bare minimum, you must be aware of what’s out there.

Take for example, Peel Funeral Home’s placelookup.net listing. You’ll quickly notice the images of thick slabs of uncooked meat, a cheery butcher, and tags that list Peel Funeral Home as a place for “Eating & Drinking” showing up for… a funeral home:

Butcher Funeral Home

Based on the funeral home’s website, they don’t seem like the type to do this as a some sort of backwards publicity stunt. My best guess is that, when pressed to choose a business category whilst creating a listing, whoever made this chose “butcher”, perhaps not understanding that this tongue-in-cheek choice would not only show up on the listing, but decide the particularly graphic imagery as well.

Either way, THIS IS IS NOT WHAT YOU WANT TO HAPPEN.

Now, as a lawyer, you aren’t at risk of appearing to be a funeral home proudly selling human meat. The takeaway for a lawyer wondering how best to manage their directory presence is this: if you don’t have, at the very least, an awareness of what’s happening with your directory listings, you could be in for a surprise when you find out.

Email Marketing with Mailchimp: 3 Steps to Success

MailChimp is pretty intuitive, but can still be intimidating for the uninitiated. If you’re considering using MailChimp for your own email marketing, here are 3 steps you’ll need to be familiar with as you get started, as well as a random assortment of helpful information to help guide you along the way.

1. Choosing Your Plan

Before you start blasting out tantalizing email campaigns, you need to choose a plan. Here are your choices:

  • Free plan: up to 2,000 subscribers and 12,000 emails per month. This is a good way to dip your toes in. The idea here is that you’ll start using Mailchimp, like it, and eventually accrue more  than the 2,000 subscribers allowed under the free plan, and start paying.
  • Growing Business: Once you’ve outgrown the free plan, Mailchimp charges based on number of subscribers (these are people receiving your emails). These plans start at $10 a month and each allows an unlimited amount of emails to be sent. If you come to rely on MailChimp, you’ll end up using some version of this plan. These plans come with increased capabilities such as automation, integration (Salesforce, Sugar, Google Analytics), and targeting.

Mailchimp plan pricing

  • Pro Marketer: At an additional $199 per month, you’ll really need to be leaning in to Mailchimp for this to make sense businesswise. This enables e-commerce functionality, A/B Testing, comparative reports and more robust automation.

2. Lists

Once you’ve chosen an account type, it’s time to import your email lists into Mailchimp. Assuming you have a preexisting list of email addresses you want to market to, it’s time to add these emails to Mailchimp in segmented lists that makes sense for marketing purposes.

  • Within Mailchimp, navigate to “Lists” and then “create new list”. From here you’ll be able to set a name, “from” email address, the contact information that will appear at the bottom of the email you send out, as well as notification preferences. Once you’ve completed this step, it’s time to import your email list.

Mailchimp you have no contacts page

  • You can do this by creating an excel workbook that includes the information you want (email, first and last name, generally). If you have trouble, Mailchimp provides some helpful resources.

When building your lists, you want to keep targeting in mind. It’s your goal to give each recipient the experience that most closely matches their interests. For example, if you’re a law firm that practices personal injury and medical malpractice, you’ll want to break your emails up into groups that correspond to each of these interest groups. One list for personal injury, one list for medical malpractice. If a potential client contacts a firm because they’re interested in a certain topic, a quick way to frustrate that person is to send them a bunch of emails about something completely unrelated to what they originally inquired about. The more specific you email lists, the better.

3. Campaigns

Here’s where we get into the bread and butter of getting your email marketing started. Mailchimp will have you customize the following fields: recipients, setup, template, design, and confirm.

  • Recipients: this is where you choose the specific list you made earlier. Your lists and campaigns should align nicely.
  • Setup: This is where you lay down the backbone of your campaign. Here you’ll add your campaign name, email subject, “from” name and email address, and perhaps most importantly, Google Analytics tracking. Assuming you have Google Analytics on your site, integrating Mailchimp with GA is easy. From the “settings” menu, title your campaigns under “Google Analytics link tracking” how you want them to show up in Analytics. Mailchimp will automatically tag each email with a utm code that uses the name you input here.
  • Template: Here you choose the template you want for your campaign. Mailchimp gives you plenty to choose from. These range from templates geared towards selling products, making an announcement, or telling a story. In addition to these categorized templates, there are also more general templates to choose from:Mailchimp template screenshotsIf none of these templates work, Mailchimp gives you the option to code your own templates.  It’s a good idea to have a consistent template built out for regular newsletters. This will quickly prove worth your while the next time you send out your newsletter and have a prebuilt framework to go off of.
  • Design: Once you’ve chosen a template, it’s time to make it your own. In “design” you are able to add text, links, images, buttons, videos, color, and more. You can spend as much (or as little) time in this section as you want.
  • Confirm: This is where you review your campaign, and schedule its send date and time. I generally try to send emails earlier in the week, and around 10 AM Pacific time.

If you have any questions about how to do this yourself or want us to handle your marketing for you, give us a call.

Picking a Winning Title Tag: No Easy Way Out

As we know, title tags are a key element of on-page SEO (Ahrefs has a comprehensive analysis of just how important they are). And as Ahrefs determined, the use of exact match keywords in title tags has the second strongest correlation to higher rankings, right after the domain name:

So, What Should My Title Tags be?

To answer this question, some SEOs end up relying on PPC ads to see test keywords. They do this by plugging a potential title tag into a PPC ad, and based on the success (or failure) of that ad, decide whether or not to apply their trial title tag to a page on their site.

According to a recent study done by the Wayfair SEO team, this tactic is dangerous.

In this test, paid ads did not consistently predict winning organic titles:

“In our testing, paid ads did not consistently identify winning organic title tags. While trying to improve your title tags is definitely a very smart SEO play, relying on PPC might end up steering you wrong. PPC was able to identify some winners, but also mislabeled losers as winners, particularly when it came to promotional language.”

The Wayfair SEO team believes the reasoning for this to be that the success of a paid ad is different in nature to the success of an organic page in a key way: those clicking on PPC ads are not a random sample of people, they are the type of searchers who click on ads. These people tend to respond positively (by clicking) to promotional language (“sale”, “50% off”, “free shipping”). When the rest of us (those that don’t click on ads) see the words “50% off” in an organic search result, we think we’re being scammed, and keep scrolling.

Takeaway

If you’re looking for a quick and easy way to find optimal title tags, it looks like you have to keep looking beyond the success of PPC ads. Unfortunately, finding the perfect title tags may take a lot of time and data.

Title Tags, Meta Descriptions – the What and the Why

Title tags and meta descriptions. One of the first additions to any new SEO’s on-page optimization arsenal. Although simple, it’s important to have a strong understanding of what titles and descriptions are, why you should use them, and how to optimize them in order to get the most cost-effective means of SEO improvement.

What Are Title Tags and Meta Descriptions?

Title Tags

A title tag is an HTML element included in the <head> section of a page on a website. To read a page’s title tag, right click anywhere on a page and click “view page source”. The title tag is the text between “<title>” and “</title>” (believe it or not):

Go ahead and give it a try on this page!

The title tag never actually appears on the page itself. It gives search engines a boiled down description of what a page is about. According Moz’s 2015 search engine ranking factors survey, title tags are still one of the most important on-page ranking factors. Title tags are helpful for search engines, and they’re helpful for users. When a user performs a search for “Mockingbird Marketing”, this is what shows up:

Mockingbird Marketing SERP

The title tag added to a page (in this case, home page) is the first thing a user sees when they come across a website in the search results. For obvious reasons, you want this text to be inviting, informative, and accurate.

But search results aren’t the only place users encounter your title tag. Title tags show up in the text displayed on your browser tab:

Title tag shown in browser tab

and in social media:

Blog post in social media screenshot

Meta Descriptions

A meta description, similar to a title tag, is an HTML element that tells the users what a page is about. It too, can be found in the <head> section of a page:

.

Meta descriptions, although not as big and bold as title tags in search results, provide users with a more detailed description of what a page is about. This text is found directly below the title in search results.

Why Should I Use Title Tags and Meta Descriptions?

There are two reasons to make sure that each page on your site has optimized title tags and descriptions:

  1. For search engines
  2. For users

Of (1), it’s unclear the extent to which this helps. In the good old days, Google would take a page’s title tag and use that as a primary ranking factor. Since then, search engines have added a multitude of ranking factors to consider alongside meta tags, reducing their clout. Currently, the exact influence of a title tag on page ranking is unclear.

Google has been more clear on meta descriptions. Matt Cutts of Google said in 2009 that meta descriptions are not used as ranking factors.

Of (2), this is where the definitive value of optimizing title tags and meta descriptions lies. Giving your pages clear titles and descriptions draws in the user.  If a user comes across the title of your page in search and it does a good job of describing exactly what the content within the page is about, the user will click, and stay, on your page.

How Do You Optimize Title Tags and Meta Descriptions?

There are a couple things to keep in mind as you optimize your title tags and descriptions.

  1. Length: Google will display the first 50-60 characters of your title tag. Keep your title within this length to ensure nothing gets cut off. Meta descriptions should fall between 150 and 160 characters.
  2. Keep Users in Mind: Spamming meta tags with keywords looks suspicious to search engines and users. When writing meta tags for a page, first go through the page and make sure you have a strong understanding of what the page is about. Boil this down to title tag and meta description length.
  3. Important Keywords First: As users scan a page filled with search results, their eye starts on the left side of the page. Place the most relevant words early in your title tag.
  4. Never repeat: duplicate titles and descriptions confuse everybody, search engines and users alike.

There You Have it

To see how all of this fits in to the bigger picture, check out ahrefs’ guide to on-page SEO. This study does a good job of showing how much of an impact meta tags have on your on-page SEO.


What Google’s New Deal Means for Anti-Piracy Attorneys

As readers search for information on the web, counterfeit sites attempt to redirect their results. In a new deal with the UK, Google says ‘not today’.

Described by the UK Intellectual Property Office (IPO) as a “landmark agreement”, the deal serves to reduce the visibility of infringing content by June 2017. This will result in many pirated sites disappearing from the first page of search results for Google and Bing when people look for content.

Initially there was question whether the deal between IPO and Google would involve any algorithm changes. In a conversation with SearchEngineLand.com, Google confirmed no algorithm changes are necessary. Google is confident that their current algorithms (namely their “Pirate” algorithm) will continue working to prevent bad content from showing up in search results.

Google voiced that their main goal is to provide high-quality content to readers that is relevant to their needs. It is important for readers to be referred to legitimate and helpful websites. The existing algorithm serves to prevent pirated content and spam from interfering with that process.

Although Google seemed to downplay the significance of this agreement, the deal is monumental for the British Phonography Industry (BPI). To them, it was a much-needed move to reduce the visibility of pirated content and reduce copyright theft.

Without major algorithm changes, this means that websites that serve the needs of their customers and readers will not be negatively impacted. Instead, we will see a reduction in sites that may redirect their readers to pirated content and spam sites.

In the US there has been additional pressure to reduce the visibility of pirated content. Google and Bing aim to provide the best information for readers, as well as ensure that content creators see their valuable content appear in the results.

Civil and white-collar anti-counterfeiting attorneys can work alongside Google’s attempts at getting pirated content off the web. Anti-piracy law is invaluable when it comes to securing the sanctity of original content, sources, and businesses. We encourage attorneys to focus on what your clients care about and help protect their original and unique content online.

How to Find (And Fix) Orphan Pages

What is an Orphan Page?

An orphan page is a page on a website that is not linked to by any other page on the site. Think of the internet like a perfectly built spider web, each strand connected to another. Now imagine, a couple feet away from the web, a strand of silk hanging mid-air, all by itself. It’s still a piece of web, and would be helpful to a spider if the spider could reach it, but this spider can’t jump, and the strand of silk is useless. This strand of silk is an orphan page.

Orphan pages are rarely stumbled upon by users. This is because a user would have to access the page directly (via URL search) or via sitemap, which doesn’t tend to happen.

Some orphan pages are orphaned intentionally. These are private pages used by webmasters that aren’t intended for users to stumble upon. But we won’t worry about these pages in this post.

Why Should I Care?

At Mockingbird, checking for orphan pages is part of our technical audit. It’s one of the many indicators we use at the very beginning of an engagement to asses a client’s website health. Lots of orphan pages = website health could be improved. Why is this the case?

  1. You might have valuable pages orphaned. Sometimes this happens accidentally. This could mean that you have great content on your site, but, as it isn’t linked to, a user will never find it naturally. This is bad for the user, but not only this, you’re missing out on the potential online credibility coming from your valuable content. People don’t link to pages that they can’t find. Search engines wont have the opportunity to recognize you as an online authority on any subject if your best pages aren’t getting seen, linked to externally, or talked about.
  2. Orphan pages might bring penalties. This is a debated point among SEOs. Some speculate that, upon discovering orphan pages on a site, search engines will treat these pages as doorway pages (unnatural pages intended to rank artificially high for certain search terms to bring in users), and penalize the site. Most disagree, but in this case it’s worthwhile to error on the side of caution.

How Do I Identify Orphan Pages?

There are plenty of ways to identify orphan pages on your site, but no matter how you get the it, all you need is:

  1. A complete list of every page on your site
  2. A complete list of every crawlable page on your site.

For (1.) I use the xml sitemap*. If this sitemap is working correctly, it should be updating automatically each time a page is added to your site, regardless of whether or not it’s orphaned.

For (2.) I use Screaming Frog. Screaming Frog crawls the site as a Googlebot/Bingbot would. This means it starts at the homepage and works down, exploring each link it encounters on its way. Because Screaming Frog works in this way, it excludes pages that are not linked to on any other page. You called it, orphan pages.

Now that you have both a list of every page on your site, and a list of every crawlable page on your site, it’s time to compare. Bring both lists into an excel spreadsheet and run a duplicate check. All pages that don’t appear in your spreadsheet twice (these should be the pages that appear in your sitemap, but not Screaming Frog) are orphan pages.

What Do I Do Once I find Them?

This is the easy part. If you’ve found unintentionally orphaned pages on your site, assess their value. If an orphaned page has thin content, duplicate content, or is outdated, you’re better off without it. Noindex these pages. For valuable, relevant orphaned pages that you find, link to them from a natural page. Put yourself in the user’s shoes and imagine where your orphaned page would be the most helpful. If you discover an orphan page on your auto website called “Everything You Need to Know About Pistons”, your “Engine Parts” page would be a great candidate as a page to link from.


*In order to access this, just tack “/sitemap_index.xml/” on to the end of your homepage URL.


What Links to Axe Before Penguin Axes You

I recently wrote a post on how to use Google’s Disavow Tool to disassociate your website from other sites that might bring unwanted attention from Google (Penguin). In that post I brushed over the most important part: choosing what links/domains to disavow. Here are some guidelines on what to keep in mind as you investigate a link to decide whether or not you should disavow.

Getting Started

Before you start axing links left and right, you want a strong understanding of what links are helping, and what links are harming you. A good place to start is Google’s Quality Guidelines. Here you can find an easy-to-understand breakdown of what practices Google does not endorse. If a website that is linking to you is breaking most or all of these rules, you should strongly consider disavowing that site. Amongst their quality guidelines is this principle:

“Make pages primarily for users, not for search engines”

This is arguably the most important rule to keep in mind as you assess your backlink profile. When investigating a link, always be aware of whether or not the site was built with people in mind. If a site was built with search engines in mind, the chances that this link is hurting, not helping, is high.

On-Site Considerations

Websites that you don’t want linking to you give you some hints that they might be harmful. Here are a few of them in no particular order:

  1. Styling: This is the most immediately obvious factor. If a site has no color, images, or formatting, there’s a good chance it wasn’t built for people to use.
  2. Contact info: This is the first thing I look for after styling. If a website is concerned about the people that are using their website (user experience, satisfaction, etc.) they will make it very easy for those people to reach out to them. If a site does not provide a phone number or email address, this isn’t a great sign. Many websites (directories in particular) will have a comment box in place of this information. Sometimes these boxes are used by webmasters as a  valued means of communication with their users, sometimes they are just a guise to give the appearance that someone is monitoring a site. The only way to tell is to send in a form.
  3. Office location: Do they have a physical location? If so, this is good for credibility.
  4. Content: Does this site have any original content? Has this content been added to recently? Yes? Good for credibility.
  5. Ads: What type of ads do you see? Are they high quality and relevant? Or do they seem spammy and cheap?


(hint, ads like these are a bad sign)

  1. SSL: Is this site secure? If so, this is a good sign.
  2. Reciprocal/Paid Links: If you can find anything on a site about engaging in reciprocal or paid linking, run.

Note: These considerations do not stand alone. There are many great websites that you want linking to you that don’t have SSL. Some great websites have poor styling. These considerations must be taken together, with the following off-site considerations, to get a broader picture.

Off-Site Considerations

You’ve poked around a site that’s linking to you. It breaks some of the guidelines above, but you’re on the fence about whether or not it could be a harbinger of Penguin. It’s time to look at some metrics to gauge how much trust you should place on this link. Depending upon the tools at your disposal, this process might look slightly different. I like to use a combination of Majestic, Ahrefs, and Moz’s Open Site Explorer.

What to look at:

  1. Domain/URL Rating: Plug your questionable link into Ahrefs and check its Domain Rating and URL Rating. Just as it sounds, the Domain Rating ranks the entire domain, the URL Rating is only concerned with the page on the website that is linking to you. If you don’t have Ahrefs, Moz Open Site Explorer offers similar metrics (Domain Authority/Page Authority, respectively), while Majestic gives Trust Flow and Citation Flow. These Figures give a baseline understanding of a website. If a site has a Domain Rating between one and five, this should be cause for concern.
  2. Number of Backlinks vs. Number of Referring Domains: This is one of the most decisive considerations. All three of the tools mentioned above will give you their best guess as to how many links are pointing to a page, as well as how many different domains these links are coming from. What you want to watch for here is an outrageous amount of links, coming from a small number of domains. It’s important to understand that 100 links from one (generally spammy) domain is not as valuable as 100 links from a rich, diverse group of websites. This comparison can make it obvious that a link is trying to cheat the system. There is no threshold for the highest allowable ratio of links to domains. If you are unsure, use this information in tandem with other considerations to decide on the quality of a website.
  3.  Spam Score: Moz’s Open Site Explorer spam tool feature attempts to put together many of the considerations mentioned so far. This tool isn’t always spot on, but it can give you an idea of what you’re working with. If a site has a spam score above three, this should concern you. If a site has a spam score of eight, it’s time to move on.
  4. Momentum/Potential: Sometimes, if a site is new, it won’t have an established backlink profile. Its Domain Rating will be low, and if you’re on the fence about it, it might not seem worth keeping around.

As an example, take Wired.com. Earlier this year, Wired’s backlink profile was not nearly as impressive as it is right now. If Wired had linked to your website in March you might have been happy. But, because of the sharp improvement in Wired’s backlink profile since then, that link to your website is now worth much more. Today you’d be ecstatic. Basically, if a site links to you and it’s not impressive now but you think it has potential, or is already on its way, don’t disavow.

There You Have it

These are just a few of the many tactics you can use to look in to your backlinks.


Google’s Disavow Tool: How To

You run a website. Perhaps you hired a bad SEO in the past, or you yourself have done some questionable link-building at some point or another. You fear you might get hit (or already have been hit) by Google’s Penguin algorithm.

Don’t fear. Google’s Disavow Tool is here, and I’m here to tell you how to use it. In this post you’ll find step-by-step instructions on how to use this tool and some background on why you should (or shouldn’t) be disavowing.

Before We Get Started, Some Notes

First, for those that don’t know, Google’s Disavow Tool is basically a way for you to tell Google “I don’t know that guy”, prompting Google to ignore certain links pointing to your site that it finds when crawling, and (ideally) not hit you with a penalty.

Second, it’s important to understand the gravity of what you’re doing before you start disavowing links left and right. The links coming to your website are an important signal (check out Pagerank) of how useful your site might be to users. If you have high quality links from credible websites, you REALLY DON’T WANT TO DISAVOW THESE LINKS. The only links you should be disavowing are those that are potentially harmful to be associated with online. That being said, you can always make adjustments to your disavow file. A link can be un-disavowed, although this will not happen immediately.

Third, nobody (besides Google) really knows the exact implications of submitting a disavow file. Some people say it doesn’t do anything, some swear by it.

Fourth, after you upload your disavow file, keep it. You’ll want to add to it (as opposed to replacing it) as more questionable links show up down the road.

Fifth, a link can be both potentially harmful AND helping you in rankings. It’s a fine line. Some links Google might not have identified as dubious, but they will, and when they do, you get hit with a penalty. It’s smart to preemptively disavow links you know to be potentially harmful now, and get busy building links to replace these with credible sites.

That being said, let’s get started, shall we?

Step 1. Identify Offending Links.

This is the hardest part. For more on this, check out my other blog post. To summarize, your goal is to identify the links that Google will perceive as dubious. What links does Google perceive as dubious? Those that are trying to trick it. If a link doesn’t exist to serve a purpose for the user, that’s a bad start. If a link exists because there was money or links exchanged to get it, now we’re in trouble. Google provides a set of guidelines to make this process of choosing links to disavow easier.

Run through and compile these dubious links into an excel spreadsheet.

Step 2. Contact Webmaster

Google recommends reaching out to each site you no longer want linked to you and personally requesting that they remove the link in question. You can do this by visiting the site and looking for an email address or filling out a comment box.

As you can imagine, this can be a tedious process. Send out your requests, then wait a week. Keep notes of which sites you contact, and which sites respond/remove links. Remove the links that webmasters have taken down from your spreadsheet. For the (many) links that remain, it’s time to disavow.

Step 3. Creating a Disavow File

This file should have one item per line, and follow these two rules:

1. Your disavow file must be a .txt file (At mockingbird we like to use Sublime Text, which automatically saves as a .txt file. This makes adding notes later on easier, and it’s free).
2. Your disavow file must be encoded in UTF-8 or 7-bit ASCII

To follow each of these rules, I copy and paste my links for disavow from excel into Sublime Text. You can, however, just save your excel spreadsheet as a .txt file.

It’s important to note that that you can either disavow one link, or all links from a domain at once. If you want to disavow just a link, include it in your disavow file in the following form:

In order to disavow an entire domain, include the domain in your disavow list like this:

domain: hackers.sketchy.com

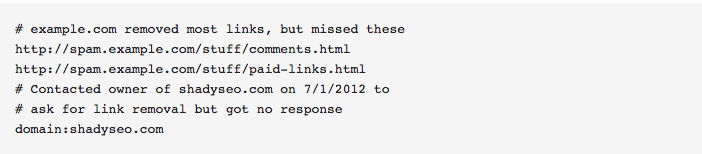
We’re almost done! Before you submit, Google recommends that you annotate the domains and links that we send in for disavow. They give the following example:

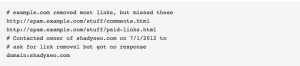
These notes (following the “#”) are purely for personal use. They’ll come in handy when you’re adding to this list later.

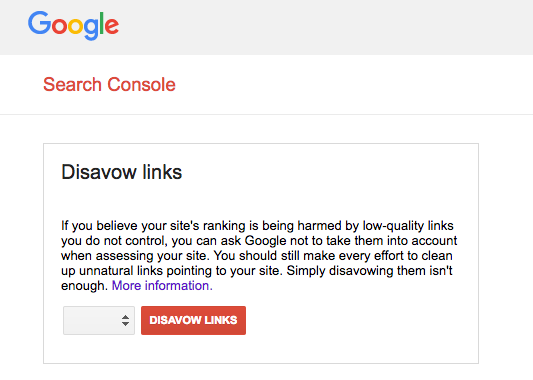
Step 4: Submitting Disavow File

  • Follow this link
  • Make sure you are logged into the correct Google Search Console Account.
  • (if you have multiple) Select the website you wish to disavow links to.
  • Click “Disavow Links”

  • Choose your .txt file.

Bingo. You’ve submitted your disavow file. Give Google some time to recrawl your site, generally a number of weeks.

Getting the Most Out of Ahrefs

We recently subscribed to an SEO toolkit called Ahrefs at Mockingbird. We did this because the overwhelming majority of voices weighing in across the web seem to agree that while Ahrefs is a little more expensive than, say Majestic or Moz, it’s more accurate. We like accuracy.

After playing around with Ahrefs, investigating features, and watching many of their help videos, I put together this guide that can serve as a how-to-get-the-most-out-of-Ahrefs manual, complete with basics, some cons, as well as some advanced features offered by Ahrefs.

What Ahrefs does:

Ahrefs brands themselves as:

“A toolset for SEO and marketing. We have tools for backlink research, organic traffic research, keyword research, content marketing & more.”

Basically, Ahrefs crawls the web and reports on what it finds. Its key functionality is its backlink checking capabilities. According to a study we found, Ahrefs reports on a higher ratio of live, accurate links than any other similar service. Based on our own experience with other tools, so far this seems to be the case.

Pricing:

The costs of different Ahref plans run as follows:

How to Use it:

Dashboard:

The first step towards using Ahrefs to the fullest is adding important sites to your dashboard (adding a “campaign”). This allows you to quickly and easily keep tabs on the websites you are most interested in. This is helpful insofar as you wont need to enter a url each time you want to check on a certain site, but adding a site to your dashboard also allows you to setup automated email reports. These reports give you your site’s vitals as they pertain to backlinks (new/lost/broken), keywords (are you still ranking for important keywords?), and online mentions (who’s talking about your website?) on a weekly or monthly basis, depending on your preference.

Backlinks:

Ahref’s backlink checker is its meat and potatoes. They have an easy-to-use interface that makes checking in on your sites’ backlink profile relatively intuitive.

To illustrate some of Ahref’s backlink checker tool’s capabilities, here’s an example that came up the other day; A co-worker noticed an unusual amount of dofollow links pointed at a client’s website in the past two months. She wondered if there was a way to quickly check in on backlinks that had been added in the last two months that were dofollow, and whether any of these links were related to each other. Let’s review:

  1. New links within last two months
  2. Dofollow
  3. Related to one another?

To figure this out, I used Ahref’s “New Backlinks” tool. Once inside, I adjusted the settings as follows:

As you can see, the date is set to include the last 60 days, the link type is set to “Dofollow”, and, perhaps most importantly for what my coworker was trying to accomplish, the links are set to show up as “One link per domain”. This last feature allows you to condense all links from the same (generally spammy) domain into something more easily digestible.

Once here, use the toolbar above the backlinks to further hone in on the information you’re interesting in seeing. Here you can prioritize how your backlinks are presented to you based on highest/lowest: Domain Ranking, URL Ranking, # of external links on page, social, date found by Ahrefs, or the number of times a domain links to your site.

Disavow tool:

This feature impressed me. Once you’ve added a site to your dashboard, the “Disavow Links” tool becomes available. This tool allows you to stockpile and organize links that you don’t want linking to your site. As you go through new backlinks, or all backlinks, you’ll see a small box waiting to be checked:

Once you click this box, you can choose to either disavow only that URL, or the entire domain. Once you’ve done this, the backlink is saved to your disavow list.

Once you’ve compiled a list worth disavowing, Ahrefs makes it easy to export the list as a txt. file, so you can send it straight to Google’s disavow tool (with the addition of some annotation on your part).